macOS bootable installation partition
Creating a bootable installation partition in macOS
In this blog post we will take a look at how to create a bootable installation/recovery partition in macOS. This is useful if you want to reset or recover your macOS device by re-installing macOS.
This method works for both an external bootable USB drive as well as an internal bootable partition, for situations in which you might not have access to an external drive. This method also works if for some reason you need to downgrade macOS to an earlier version.
Partitioning and Formatting
For external installation media
If you plan on using an external USB Drive for MacOS recovery the only thing you need to do for preparation is to format the drive as FAT. You can do this this through Disk Utility. This is useful when you need to troubleshoot a different Macbook, which does not yet have a recovery partition. Of course in this situation both macOS devices need to be compatible with the version of macOS.
For internal recovery partition
However, you can also partition your internal drive, in order to reinstall macOS from there. This is useful when you want to do a clean reinstall of macOS and do not have access to an external drive. Also, the installation would be much faster, as in most situations an external drive will be much slower. This assumes you still have enough free space on your hard drive.
Head over to Disk Utility and create a new partition. Keep in mind, it needs to be a Partition and not a APFS Volume (see screenshot below).
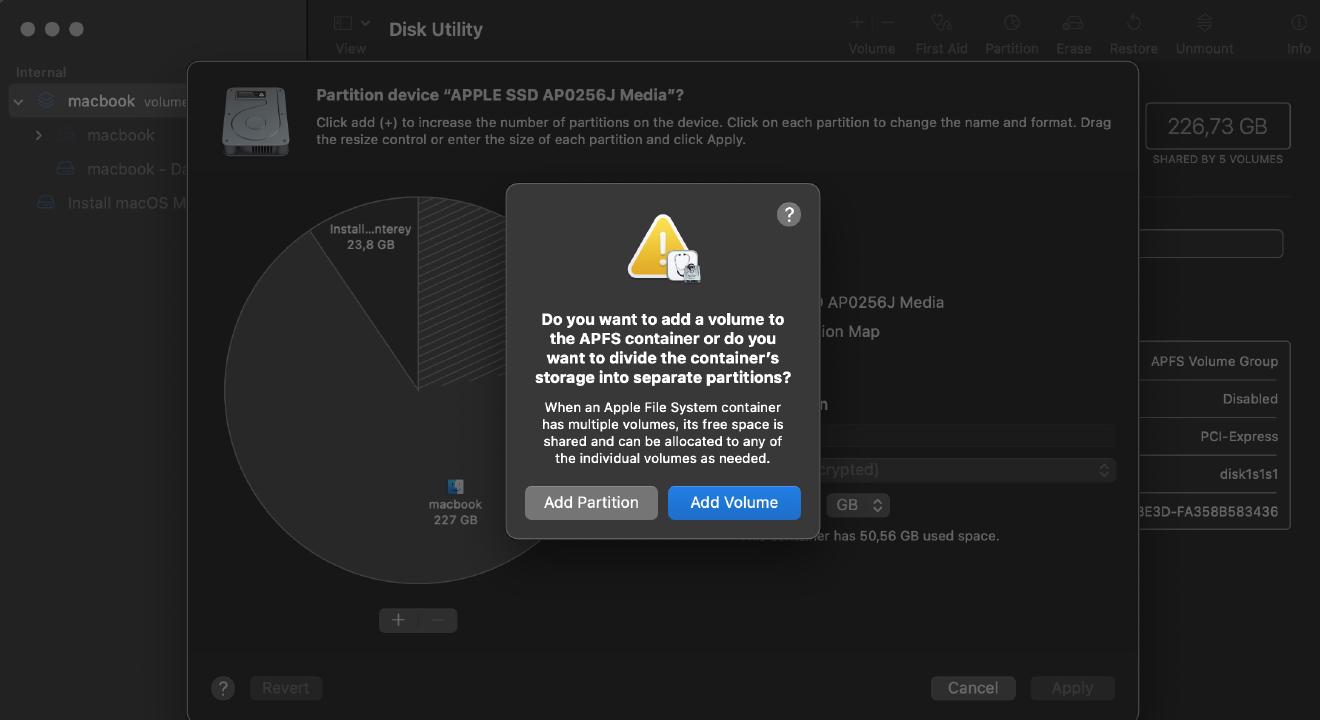
macOS Disk Utility Screenshot
To be safe you can size it around 20GB. Format it as FAT.
Downloading a macOS installation
Now that we have our drive (external drive or internal partition) ready we need to download a macOS installation. This can be done easily through the command line/terminal.
First of all, see all the macOS versions that are compatible with your device with this command:
softwareupdate --list-full-installers
Then pick a version number and download it with this command (in this example it’s macOS Monterey 12.6.7):
softwareupdate --fetch-full-installer --full-installer-version "12.6.7"
As the macOS installation is quite large it might take a lot of time. When it is downloaded you will notice a new icon in the Application folder.
Creating installation media
In order to create the installation media, you first need to take note of your target drive.
You need to note the path (mount point) in Disk Utility, which looks like /Volumes/....
This can be an external drive which we formatted earlier, but it can also be an internal partition.
To write the macOS Installation to it use the following command:
sudo /Applications/Install\ macOS\ Monterey.app/Contents/Resources/createinstallmedia --volume /Volumes/OC
You would need to substitute “Monterey” with the applicable name (in Terminal press the TAB key after typing “Install”) and substitute “OC” with the applicable mount point name you have noted earlier. After some time the drive will be ready.
Booting your macOS device
Now you should be able to boot the installation media: Turn of the computer, then turn it on and immediately hold the “option” key. Your drive should appear there, select it and follow the instructions on screen.
Downgrading from OpenCore Legacy Patcher
My personal reason for this blog post came to be when I wanted to downgrade my Macbook from a newer macOS version, which was installed through the OpenCore Legacy Patcher. As macOS isn’t very happy with downgrades, a clean install was necessary. But that installation didn’t create a recovery partition and I also did not have access to a external USB drive. As I didn’t find clear instructions for this I decided to write this post. So the cool thing is that you can downgrade your Mac to any version.